一些常用的Nginx+Passenger配置
摘记一些常用的nginx和passenger(Passenger + Nginx)配置
Basic验证
测试环境的服务要放到互联网上时,如果为了避免测试服务的内容被搜索引擎收录,或者只提供给部分用户试用时,可以设置Basic Auth来限制访问。Basic Auth可以在应用层做,也可以在Nginx侧简单的设置。
如下是Nginx侧的设置方法, 摘录自Nginx官网文章Restricting Access with HTTP Basic Authentication
设置htpasswd
- 确保apache2-utils (Debian, Ubuntu) 或者 httpd-tools (RHEL/CentOS/Oracle Linux)已经安装。
- 创建htpasswd文件, 使用
-c来创建新文件。如下是给用户名carl生成.htpasswd文件,在提示信息中输入访问密码。1
2
3
4
5$ sudo htpasswd -c /etc/nginx/.htpasswd carl
New password:
Re-type new password:
Adding password for user carl
$ - 如果要创建新的用户,那么去掉
-c参数,往htpasswd文件中添加用户1
2
3
4
5$ sudo htpasswd /etc/nginx/.htpasswd shen
New password:
Re-type new password:
Adding password for user shen
$ - 确认.htpasswd文件中是否包含了刚设置的用户carl和shen
1
2
3
4
$ cat /etc/nginx/.htpasswd
carl:$apr1$ofR4vRu4$RwMK.HQawTD8/v.YOA2/d.
shen:$apr1$c1vlrfgt$TqDy9JDsNcGyfTzcSOPLG0
$
配置nginx
使用auth_basic和auth_basic_user_file来在nginx侧配置Basic Authentication
- auth_basic: 可以设置一个string或者off,off表示关闭Basic Authentication
- auth_basic_user_file: 指定passwd验证文件
例子:
1 | server { |
说明:
- auth_basic 不为off,表示开启Basic Authentication
auth_basic_user_file .htpasswd表示使用密码文件.htpasswd- location /images/中
auth_basic off;标明访问/images/下文件不需要验证。
试验
如上配置且重启过nginx后。
访问http://test.jibing57.com就会弹出验证框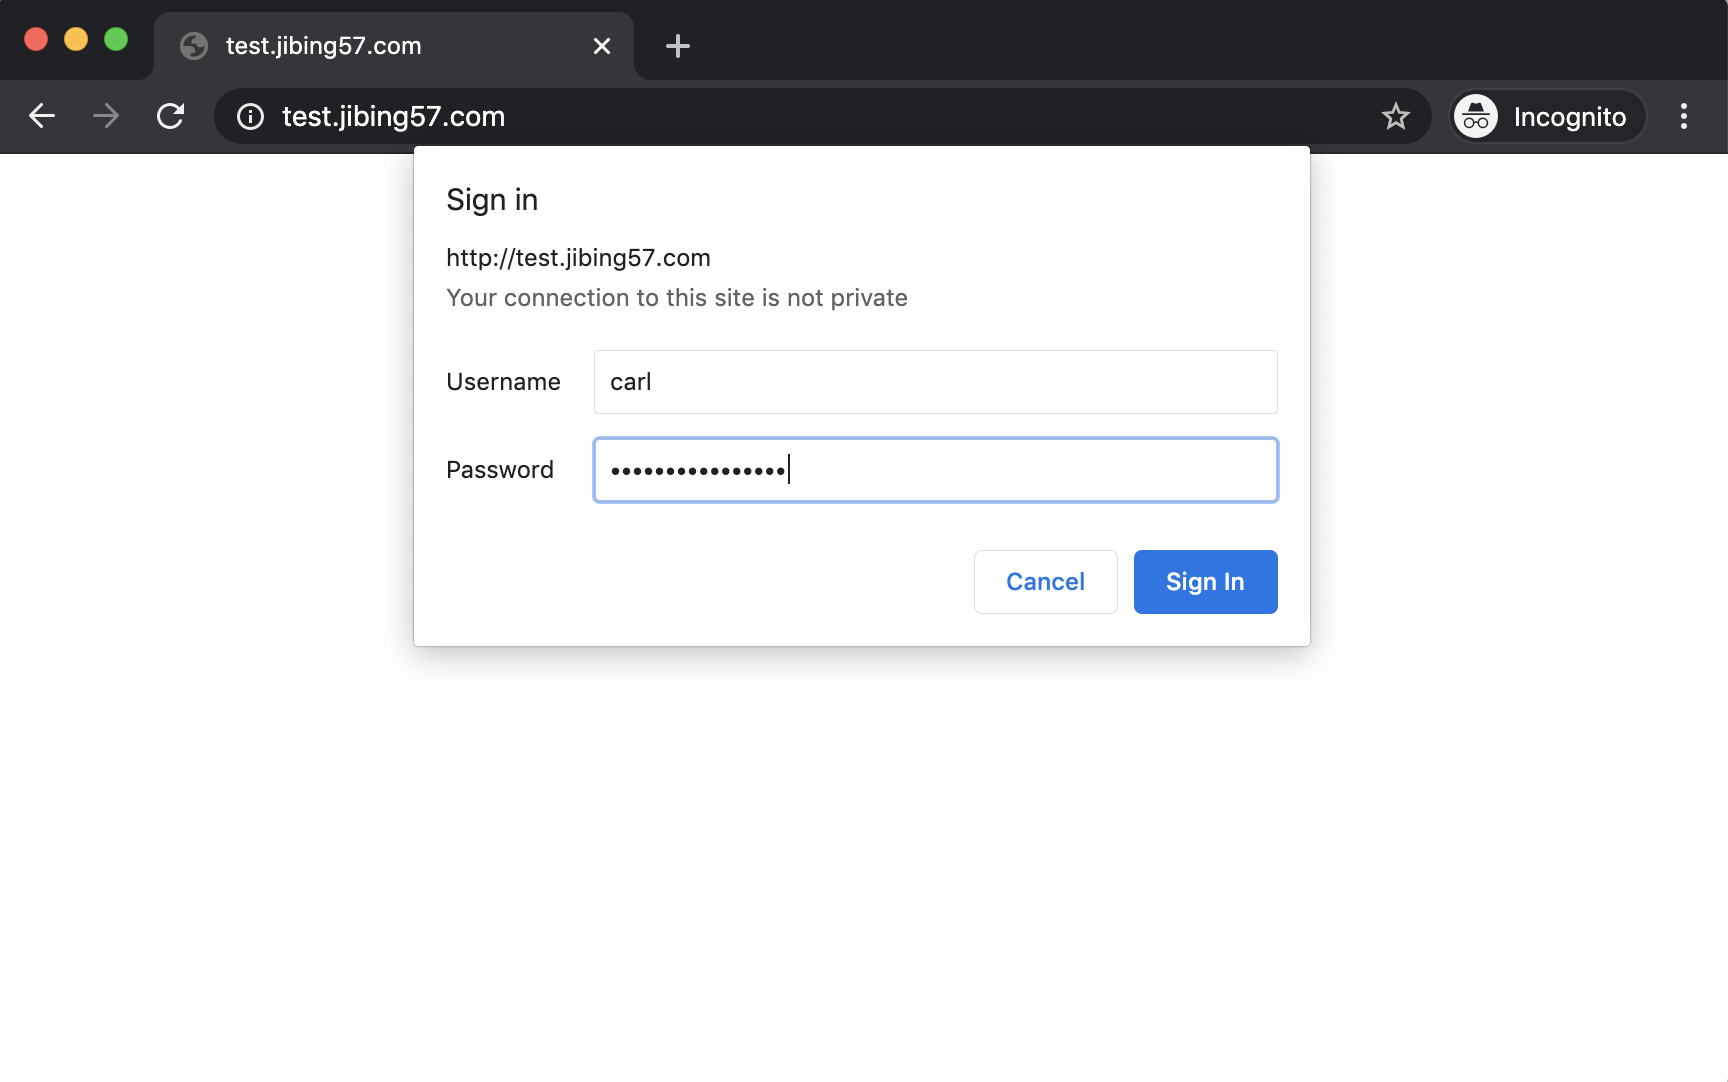
访问http://test.jibing57.com/images/AWS/S3/steve.jpeg 就不需要验证
https配置
https配置和例子
配置https的官方链接: Configuring HTTPS servers
ssl module参数配置说明链接: Module ngx_http_ssl_module
典型配置:
1 | server { |
延伸阅读: SNI
SNI说明
SNI产生的背景,如下文字来自维基百科
基于名称的虚拟主机允许多个DNS主机名由同一IP地址上的单个服务器(通常为Web服务器)托管。为了实现这一点,服务器使用客户端提供的主机名作为协议的一部分(对于HTTP,名称显示在主机头中)。但是,当使用HTTPS时,TLS握手发生在服务器看到任何HTTP头之前。因此,服务器不可能使用HTTP主机头中的信息来决定呈现哪个证书,并且因此只有由同一证书覆盖的名称才能由同一IP地址提供。
SNI是一个扩展的TLS计算机联网协议,在握手阶段由client发送的client hello中添加Extension的Type为server_name的方式来告诉服务端要访问的server name。服务端根据server name来返回对应的ssl证书信息。从而允许服务端支持在同一个IP,同一个端口上根据不同的server name来部署不同的https证书。
SNI抓包看协议
如下是通过Wireshark抓取的包。我访问www.qq.com时,握手阶段的Client Hello中,有type=0x0000的server_nam的extension。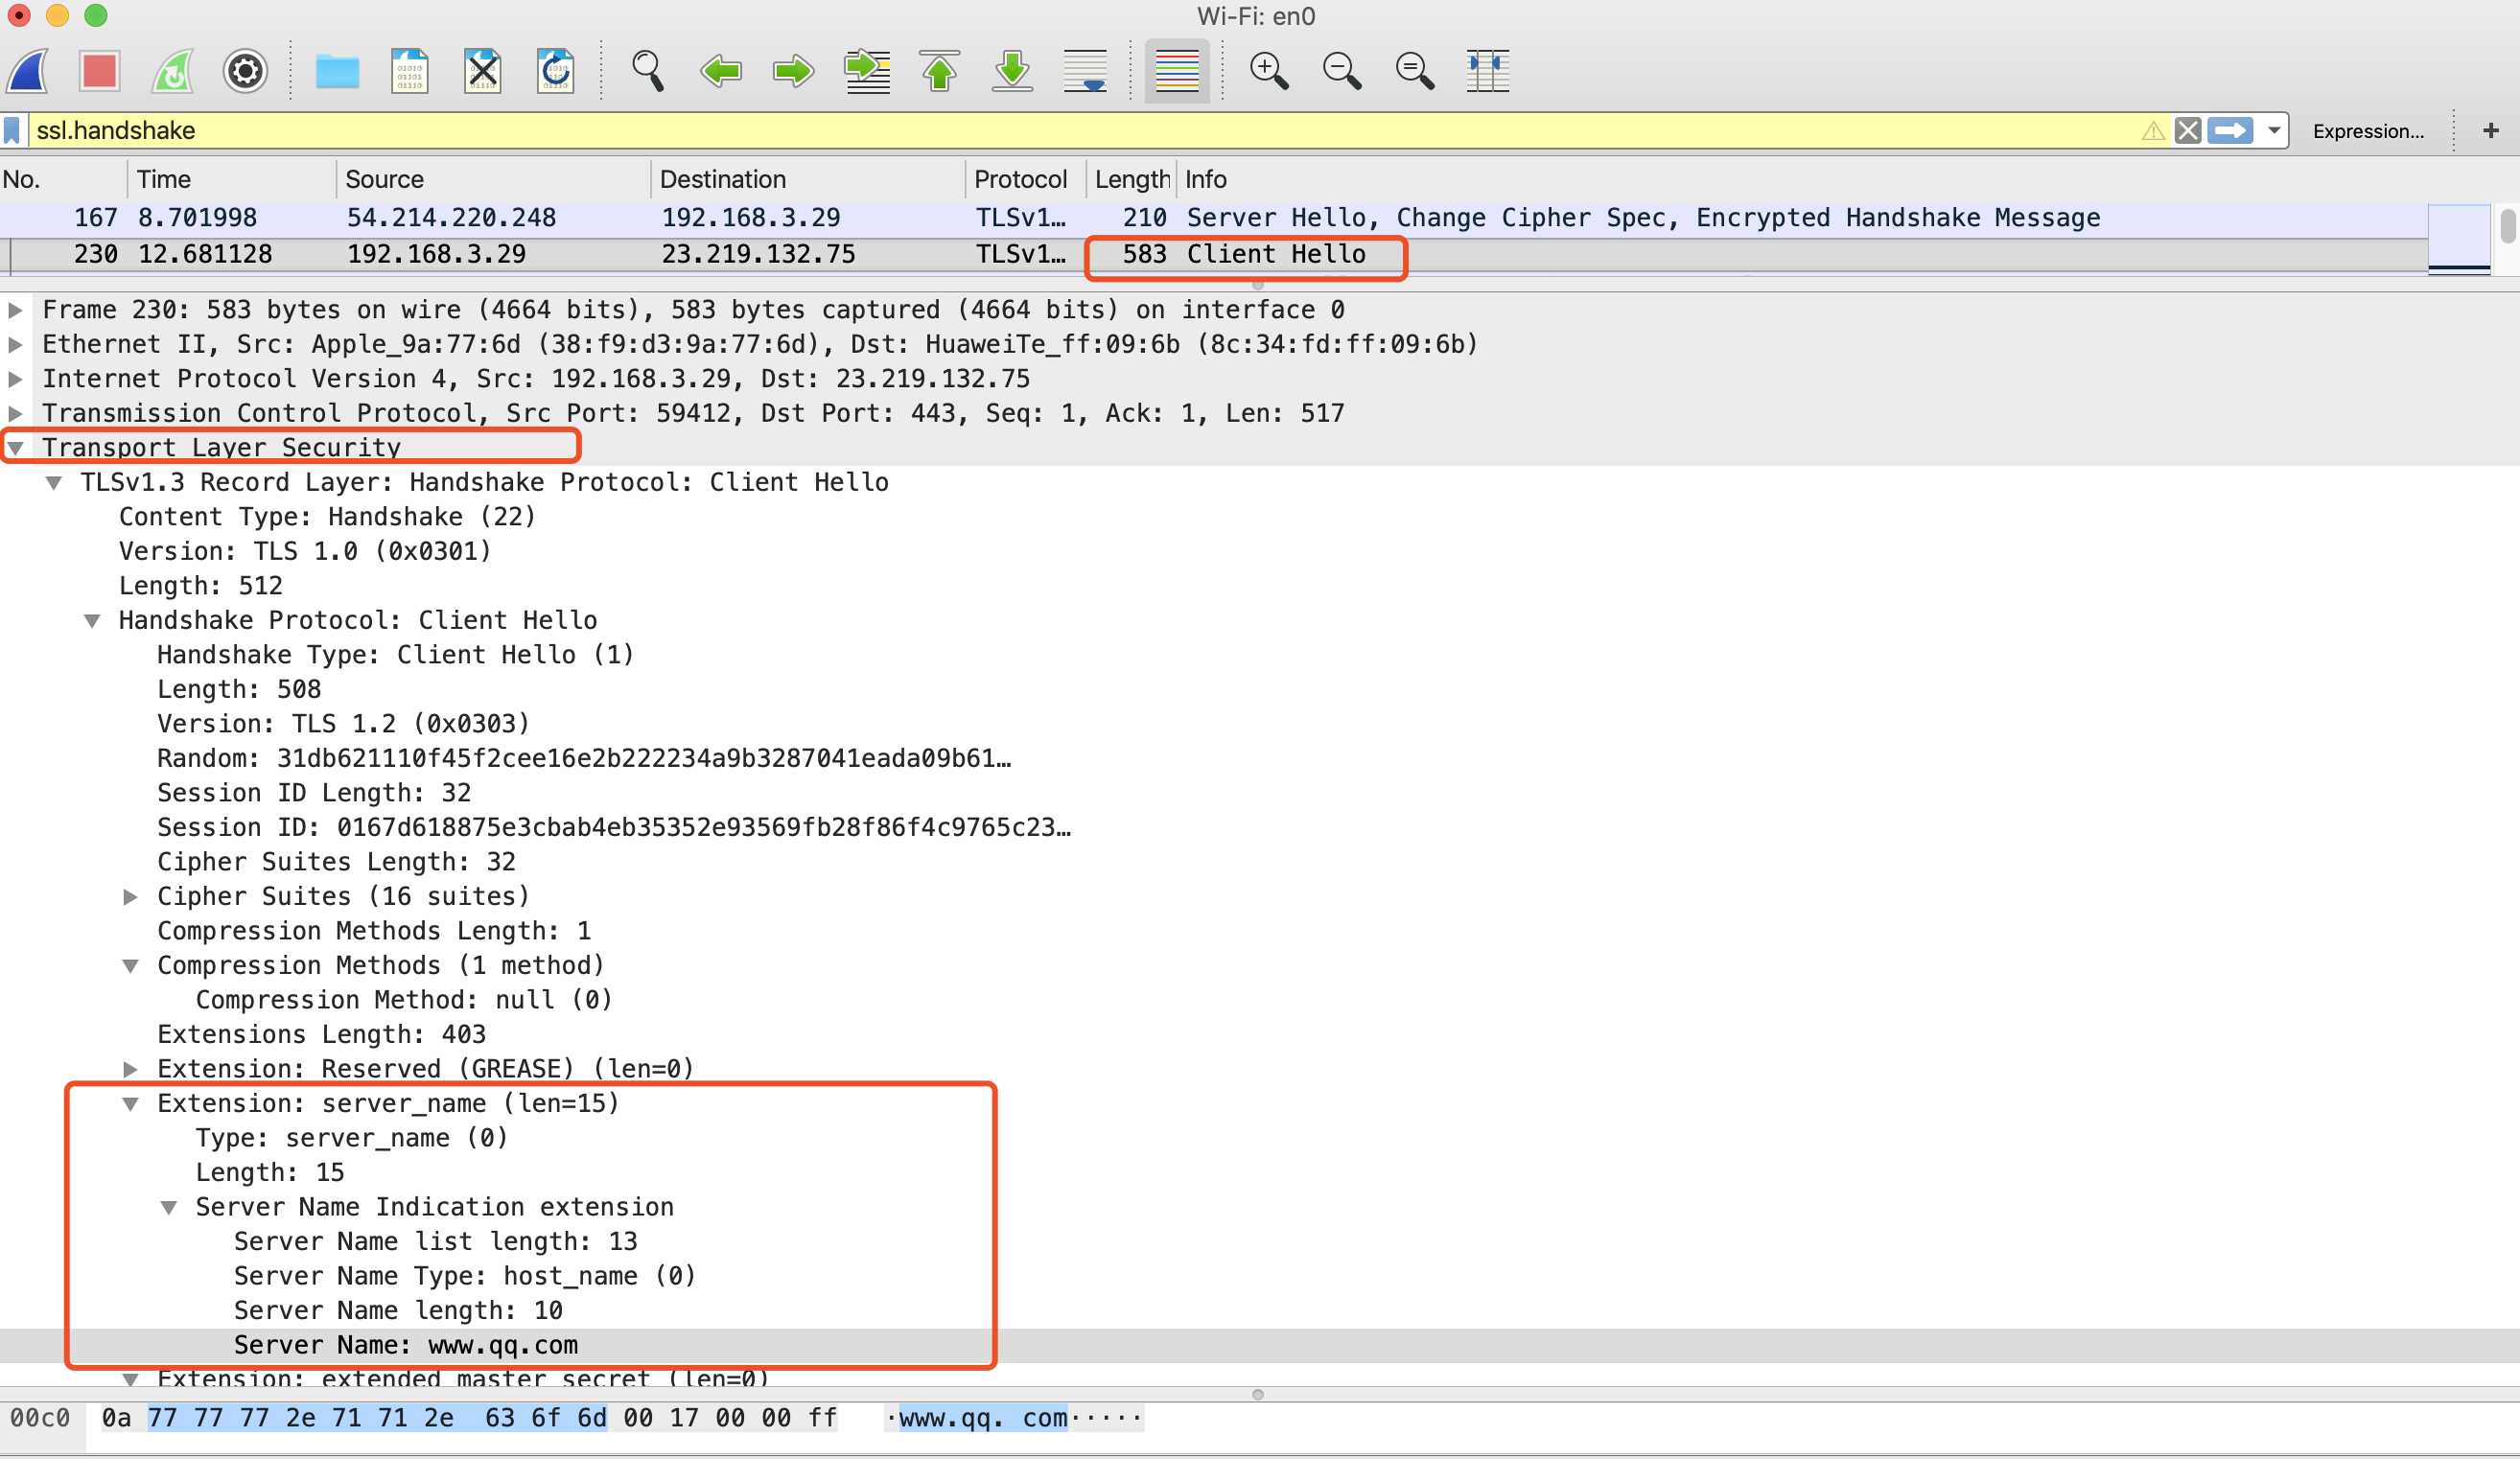
Nginx查看SNI支持
Nginx下使用nginx -V来检测nginx是否支持SNI, 如果有TLS SNI support enabled说明nginx支持SNI
1 | $ nginx -V |
SNI参考资料
- Nginx官方文档对SNI的简要介绍Server Name Indication
- SNI wikipedia - Server Name Indication
- SNI in RFC 6066
Nginx 444
Http code 444是nginx自定义的状态码,不是标准的HTTP code, 表示关闭一个连接,而不返回任何的响应头。
配置不响应未知Host的方法
配置Nginx不响应未知Host的请求的方法参见之前文章Nginx的HTTP Code444和307设置
配置5xx回应为不响应
配置5xx回应为444。
1 | server { |
Nginx redirect配置
Nginx 301和307 redirect配置参见之前文章 Nginx的HTTP Code444和307设置
基础配置如下:
1 | server { |
配置gzip压缩
Nginx gzip模块配置说明ngx_http_gzip_module
Nginx gzip_static模块配置说明ngx_http_gzip_static_module
gzip配置
典型配置:
1 | http { |
其中:
gzip on: 是否开启gzip模块,on表示开启,off表示关闭;gzip_buffers 16 8k: 设置临时内存空间,8k表示申请单位是8k,16表示每次以16个8k的单位去申请gzip_min_length 1024: 表示压缩的最小size,如果文件小于1024,则不会被压缩。gzip_http_version 1.1: 表示gzip基于http 1.1进行压缩,默认就是HTTP 1.1gzip_comp_level 6: 表示压缩等级,数字越大,压缩越好,但越占用CPU,默认值是1.gzip_types: 表示需要进行压缩的Content-Type的类型,文本类型的js,css,text,xml,json等压缩后效果比较明显gzip_proxied: Nginx作为反向代理的时候启用,开启或者关闭后端服务器返回的结果,匹配的前提是后端服务器必须要返回包含”Via”的 header头。- 默认是 off
- off - 关闭所有的代理结果数据的压缩
- expired - 启用压缩,如果header头中包含 “Expires” 头信息
- no-cache - 启用压缩,如果header头中包含 “Cache-Control:no-cache” 头信息
- no-store - 启用压缩,如果header头中包含 “Cache-Control:no-store” 头信息
- private - 启用压缩,如果header头中包含 “Cache-Control:private” 头信息
- no_last_modified - 启用压缩,如果header头中不包含 “Last-Modified” 头信息
- no_etag - 启用压缩 ,如果header头中不包含 “ETag” 头信息
- auth - 启用压缩 , 如果header头中包含 “Authorization” 头信息
- any - 无条件启用压缩
- gzip_proxied [off|expired|no-cache|no-store|private|no_last_modified|no_etag|auth|any] …
gzip_vary on: 是否在http header中添加Vary: Accept-Encoding,建议开启gzip_disable "msie6": gzip_disable “msie6”的意思: disable compression for Internet Explorer versions 4-6, special mask “msie6” corresponds to the regular expression “MSIE [4-6].“, but works faster.
Reference:
gzip参数的中文详细说明,可参照博文Nginx Gzip模块启用和配置指令详解
gzip_static配置
gzip_static配置:
1 | http { |
其中:
gzip_static on|off|always: 开启时,会读取预先压缩的文件,如果有gz文件,就直接返回gz文件的内容。有些老旧浏览器可能不兼容gzip格式,启用gzip_static时,最好同时保留原始静态文件。
配置最大上传文件限制
设置client允许上传的最大文件size。
Nginx官方说明ngx_http_core_module
典型配置:
1 | http { |
日志格式
Nginx日志设置的guide: Configuring Logging
Nginx http log module的说明: Module ngx_http_log_module
日志设置例子:
1 | http { |
主目录非根目录nginx配置
一篇root和alias区别的文章: Understanding the difference between the root and alias directives in Nginx
nginx+passenger配置子目录的例子
1 | location /movieticket { |
CentOS 6和7下的启动脚本
Nginx在各个系统中的启动脚本索引: NGINX Init Scripts
CentOS 7下启动脚本
CentOS 7下systemd官方推荐脚本: NGINX systemd service file
示例如下,其中PIDFile和nginx命令路径按照实际情况配置
1 | # vi /lib/systemd/system/nginx.service |
其中:
PIDFile需要设置成和nginx.conf中一样的文件- nginx命令路径设成实际安装的路径
PrivateTmp按照实际需求设成true或是false。PrivateTmp的意思和passenger搭配的坑,参见之前的博文CentOS 7下passenger-status报错中systemd PrivateTmp一章的说明
启动命令:
1 | # systemctl enable nginx.service |
CentOS 6下的启动脚本
Nginx官方在Red Hat下的init script文章: Red Hat NGINX Init Script
实际使用时,可以根据官网的init脚本进行修改。
如下是passenger默认安装时,手动添加的init脚本的例子, 其中nginx路径为/opt/nginx/sbin/nginx.
1 | $ cat /etc/init.d/nginx |
项目部署中遇到的一些漏洞修补方法
HTTP/2漏洞 CVE-2019-9511/CVE-2019-9513/CVE-2019-9516
解决方案,升级到NGINX 1.16.1 (stable)以上
NGINX Updates Mitigate the August 2019 HTTP/2 Vulnerabilities
官方下载地址: nginx-1.16.1
Web服务器HTTP头信息公开处理
检测方法:
通过curl的参数-v来查看header和response的body, 例如 curl -v 'http://www.baidu.com/'
隐藏nginx版本号的方法:
修改nginx.conf文件 在http配置项中增加 server_tokens off;
修改源码:
修改源码,header中不显示对应的nginx和版本号
src/core/nginx.h 修改 NGINX_VER和NGINX_VERSION
src/http/ngx_http_header_filter_module.c 中 u_char ngx_http_server_string一行
src/http/ngx_http_special_response.c 中 修改 u_char ngx_http_error_tail相关内容
移除html/index.html
默认的index.html和50x.html会泄露nginx信息
移除nginx配置下默认的html/index.html
设置默认服务不返回任何消息
1 | server { |
隐藏Passenger的版本
5.0.0版本后,在配置文件中设置passenger_show_version_in_header off;
官方说明https://www.phusionpassenger.com/library/config/nginx/reference/#passenger_show_version_in_header
使用headers-more-nginx-module来去除header
可以使用扩展headers-more-nginx-module来修改nginx中的headers信息。
安装步骤
passenger-install-nginx-module安装headers-more-nginx-module的步骤:
1 | wget https://github.com/openresty/headers-more-nginx-module/archive/v0.33.tar.gz |
nginx配置
在nginx.conf中server|http的context中设置修改header
1 | 去掉指定header -- more_clear_headers 'Server' 'X-Powered-By'; |
参考
- 关于如何使用passenger-install-nginx-module中的–extra-configure-flags来安装额外模块的例子
- headers-more-nginx-module Github地址
Passenger设置最小的instance数目
passenger关于instance数目有关的几个参数:
Ruby代码中,可能会有些Gem存在内存泄露问题。所以passenger_min_instances和passenger_max_pool_size的配置要错开点,不要保持很高的passenger_min_instances数,从而可以让passenger周期性的回收进程,一定程度上可以缓解内存泄露问题。
修改passenger的最大pool size,并且设置passenger_min_instances的例子。
1 | http { |
反向代理
Nginx官方反向代理的资料
- 反向代理的GuideNGINX Reverse Proxy
- 反向代理模块配置Module ngx_http_proxy_module
简单例子
1 | http { |
相关文章
之前几篇涉及到反向代理的博文
proxy_pass 后链接是否带’/‘的几种情况
以下文字参考于: https://blog.csdn.net/u010433704/article/details/99945557
首先给出配置例子和转发结果
假设前端访问地址: http://192.168.1.1/proxy/test.html, 如下是各种配置下的代理结果。
| 例子 | 配置 | 结果 |
|---|---|---|
| 第一种 | location /proxy/ { proxy_pass http://127.0.0.1/; } |
代理到URL:http://127.0.0.1/test.html |
| 第二种 | location /proxy/ { proxy_pass http://127.0.0.1; } |
代理到URL:http://127.0.0.1/proxy/test.html |
| 第三种 | location /proxy/ { proxy_pass http://127.0.0.1/aaa/; } |
代理到URL:http://127.0.0.1/aaa/test.html |
| 第四种 | location /proxy/ { proxy_pass http://127.0.0.1/aaa; } |
代理到URL:http://127.0.0.1/aaatest.html |
结论:
HTTP URL的组成: scheme://host.domain:port/path/filename
proxy_pass后面的URL只要带path(path也可以是/), 那么代理到后端URL中时,会删除location匹配的部分,将剩余的部分追加到proxy_pass后设定的URL中。比如第一、三和四种情况。proxy_pass后面的URL没有带path,那么直接将原请求path添加到proxy_pass的URL中进行代理。
注意:
当proxy_pass后面的URL是用变量来实现的,代理规则有一些不同。具体请参照 如何配置Nginx的Dynamic Upstream指向ELB
proxy_redirect作用
proxy_redirect在官网中的用法:
1 | Syntax: proxy_redirect default; |
如果需要修改从被代理服务器传来的应答头中的”Location”和”Refresh”字段,可以用这个指令设置。
简易用法:
假如代理服务器返回了一个header头: Location: http://localhost:8000/two/some/uri/.
此时,如果配置文件中设置了
1 | proxy_redirect http://localhost:8000/two/ http://frontend/one/;` |
那么header头会被反向代理服务器改写为Location: http://frontend/one/some/uri/
反向代理并改写链接
正常反向代理请求,会将请求路径一同反向代理到upstream服务器中。
比如原连接是https://source.com/xxxxxx/helloworld, 反向代理到example.com时,链接为https://example.com/xxxxxx/helloworld
此时的配置如下:
1 | upstream xxxx { |
有些情况下,需要去掉/xxxxxx这个前缀, 将https://source.com/xxxxxx/helloworld的请求反向代理到example.com时,变为https://example.com/helloworld的话,这时可以有如下两个方法:
方法一:proxy_pass 地址后添加斜杠
之前已经介绍过,当proxy_pass后传递的值带路径时,会自动将location中匹配的路径截断。
所以,只需要将proxy_pass https://xxxx;加一个/, 改为proxy_pass https://xxxx/;, 即可
配置变为:
1 | upstream xxxx { |
方法二:手动添加rewrite改写
可以在location节点中,使用rewrite来手动替换链接。
正则匹配xxxxxx,并且只将xxxxxx后的路径反向代理到upstream中。
配置变为:
1 | upstream xxxx { |
判断参数再进行redirect
比如需要将https://test.com/?flag=dk重定向到https://staging.com/?flag=dk
nginx可以配置如下:
1 | server { |
参考: Nginx redirect URL with specific query parameter
http重定向到https
监听80端口,有请求就重定向到https请求。
1 | server { |
Passenger设置Nodejs
使用Nodejs配置的例子
1 |
|
其中参数说明:
passenger_enabled: 表示开启passengerpassenger_app_type node: 表示application类型是nodejspassenger_app_root: 用来设置应用根目录passenger_startup_file: 设置启动应用的起始文件,ruby默认是config.ru, node默认是app.js, 也可以手动指定[passenger_force_max_concurrent_requests_per_process](https://www.phusionpassenger.com/library/config/nginx/reference/#passenger_force_max_concurrent_requests_per_process): 该设置用来告诉passenger最多同时将多少个请求发到一个处理进程中。如果设置为0意味着无限,默认的-1是让Passenger自己检测。该选项主要有两个用法:- To make dynamic process scaling work in Node.js and Meteor applications. Set this option to approximately the number of concurrent requests at which the performance of a single process begins to degrade.
- To make SSE and WebSockets work well in Ruby applications. Set this option to 0.
passenger_max_request_queue_size: 设置该server最多能承载的request队列长度。passenger_pre_start: 默认下passenger启动后不会启动application进程,有请求后才会启动。这会导致第一次请求会有一些延迟。使用passenger_pre_start url可以在passenger启动时就预热application进程。- 注意点:
url的链接的domain,需要设置为server_name一样的值- 可以结合
passenger_min_instances来使用。 - passenger不会解析url中真实的domain,而是会将请求发送到localhost,同时使用url中的domain来设置
Host的header。 - 支持https请求,不会验证ssl证书。
- 注意点:
参数使用说明:
因为node单进程就可以吃进大量的request,而reqeust多了后,请求速度会降低,因此需要配置passenger_force_max_concurrent_requests_per_process来控制单个node处理请求的并发数。 Rails应用的话,就不需要配置该选项。
Passenger设置header
Passenger支持使用passenger_set_header来设置传递给application的http header。
说明链接: https://www.phusionpassenger.com/library/config/nginx/reference/#passenger_set_header
使用例子
1 | server { |
nginx location中的redirect
简单的跳转到不同域名下相同路径下的话,只需要使用return 301 https://new_domain.com$request_uri;即可。
但如果需要跳转到不同的域名的不同路径时,可以使用rewrite通过正则匹配来重写
将https://old_example.com/old_path的请求redirect到https://new_examples.com/new_path中,保留相同的其余路径和参数
1 | server { |
如果需要匹配多个旧路径,比如old_path和old_path_second,那么可用正则来实现
1 | rewrite ^(/old_path|/old_path_second)(.*)$ https://new_examples.com/new_path$2 permanent; |
参考:
Nginx反向代理Jenkins basic auth重复redirect问题
测试环境中,使用Nginx反向代理请求到后端的Jenkins服务上。
测试环境中,所有的请求都添加了简单的Basic Auth。结果发现访问Jenkins的页面,输入Basic Auth的账号密码后,会重复redirect
网上搜索过后发现是Nignx将Authorization header转给后端Jenkins服务导致的。
需要在反向代码时将Authorization的header去掉。
1 | # Don't forward auth to Tomcat |
修改过后的配置:
1 | location / { |
参考:
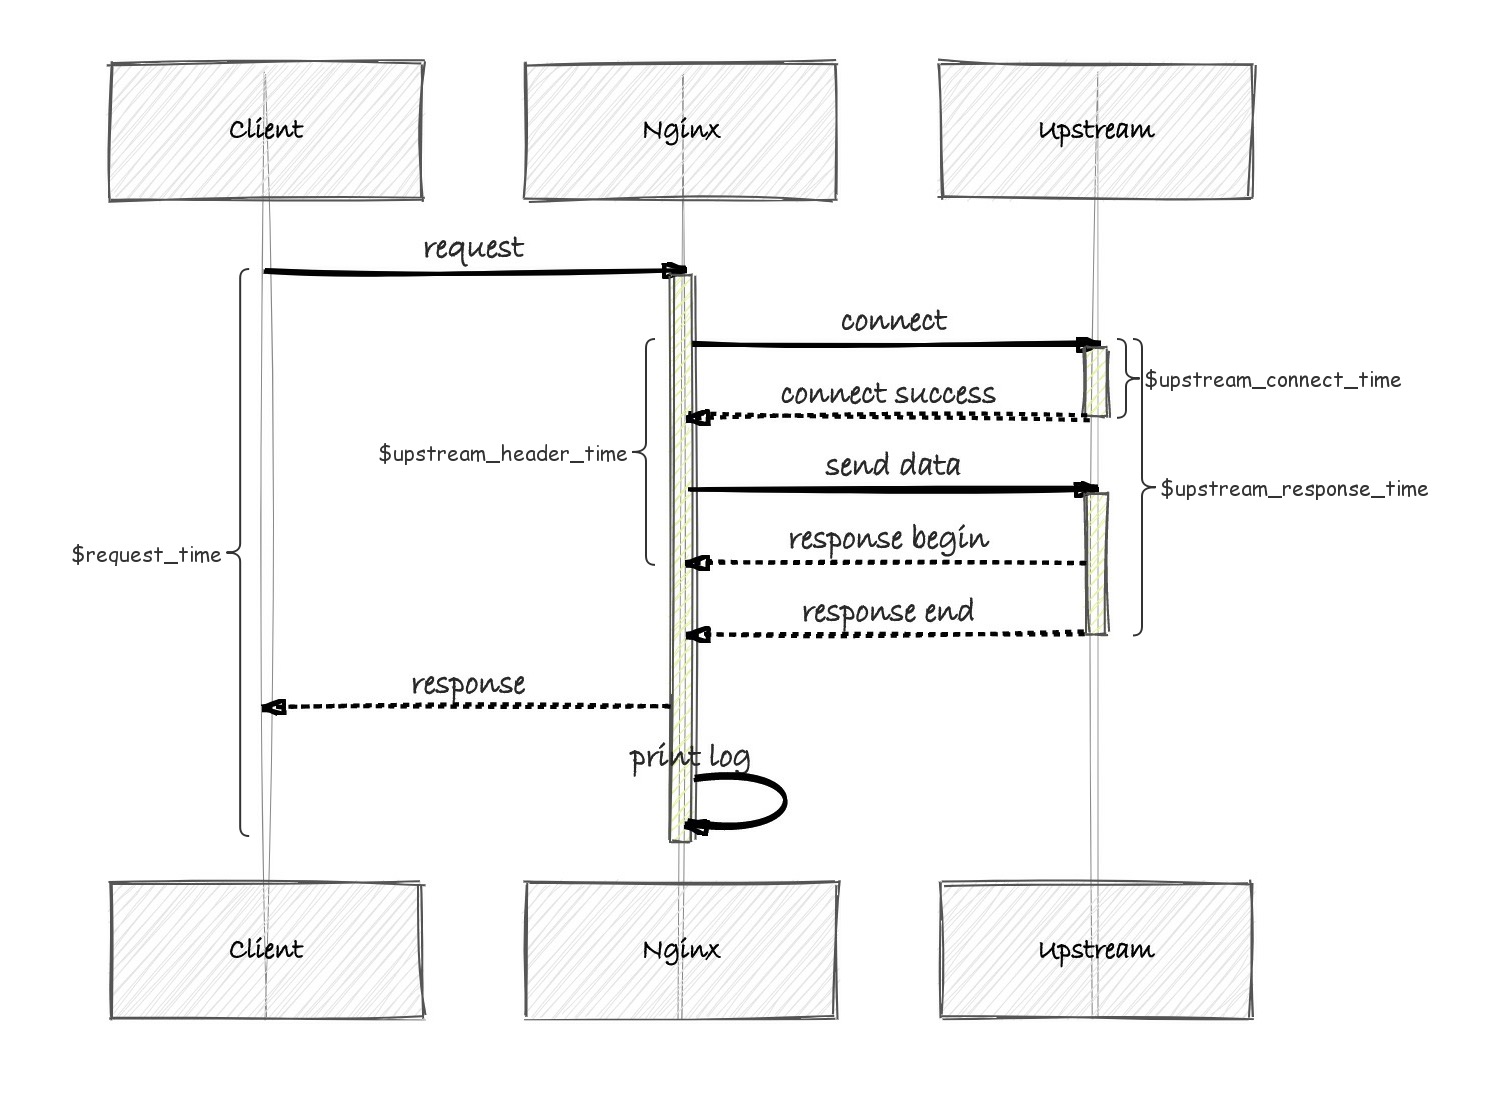
Nginx 变量upstream_xxx_time详解
网上找的一张图,完整解释了$request_time,$upstream_header_time,$upstream_connect_time和upstream_response_time各个变量代表的意义。