在网页或APP中,使用S3公开的静态资源,比如图片,小视频等。通常有这么几个常用的方式
- 直接在页面中使用S3的public链接
- 使用自己的域名,再在Web服务器侧redirect到S3的链接
- 使用自己的域名,再在服务器上经过反向代理服务,获取S3内容后再返回给客户端或浏览器。
在APP中,因为不需要考虑SEO,可以在页面或接口中直接返回S3的链接,APP直接访问S3资源,效率最高。
如果是网页,有时候为了SEO的需要,可能更多的会采用第二和第三种方式, 将资源经过服务器来中转一下。
下面介绍一下第二和第三种方式在Nginx侧的简单实现。
使用Nginx来redirect S3的链接
如下是一个简单的Nginx的配置的例子。基于以下几个前提
- 测试域名为test.jibing57.com
- 所有放在S3上的静态文件,在网站上都以
/s3_redirect路径打头
- S3 Region为us-west-2, Bucket 为
s3-for-blog
- 将
/s3_redirect开头的文件redirect到真实的S3 URL中。
nginx侧配置:
1
2
3
| location ~ ^/s3_redirect/(.*) {
return 301 https://s3-for-blog.s3-us-west-2.amazonaws.com/$1;
}
|
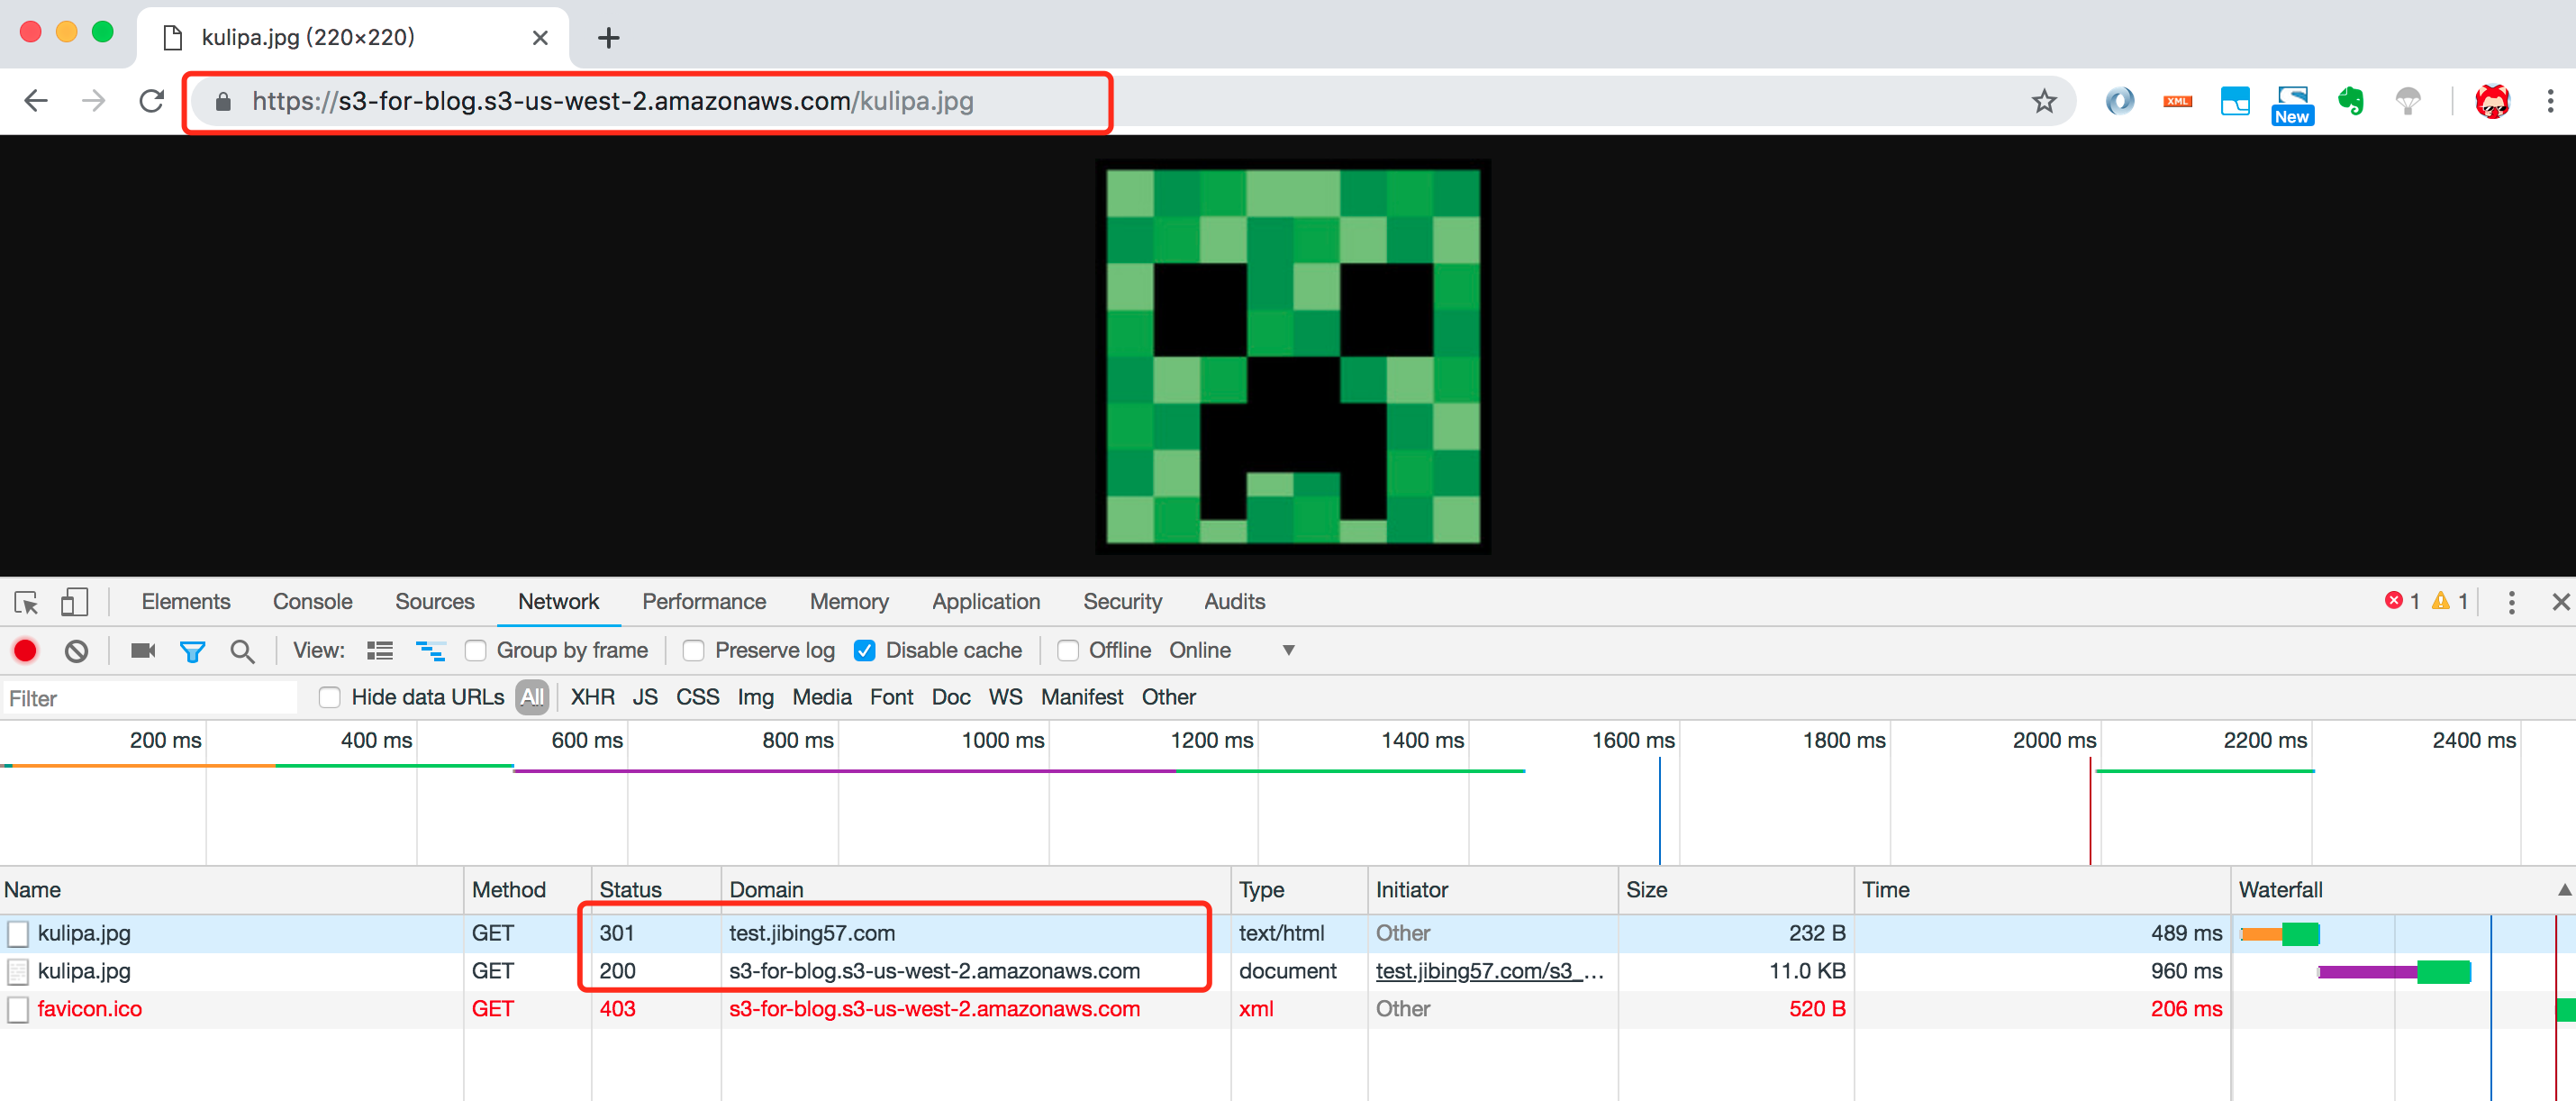
以访问http://test.jibing57.com/s3_redirect/kulipa.jpg这个测试图片为例。
Chrome侧访问测试链接的截图如下, 可以看到nginx返回了301 redirect,将路径重定向到S3中。
curl 命令的输出
1
2
3
4
5
6
7
8
9
10
11
12
13
14
15
16
17
18
19
20
21
| $ curl -L -I http://test.jibing57.com/s3_redirect/kulipa.jpg
HTTP/1.1 301 Moved Permanently
Server: nginx/1.14.0
Date: Thu, 21 Mar 2019 09:02:48 GMT
Content-Type: text/html
Content-Length: 185
Connection: keep-alive
Location: https://s3-for-blog.s3-us-west-2.amazonaws.com/kulipa.jpg
HTTP/1.1 200 OK
x-amz-id-2: u3CHOBo7dc8TBbI8q9miqTBkiinM0vktcMN6fSeXQOMhIYQyZys6k2vRqQKWiYrBSAiJ1WMzNFg=
x-amz-request-id: 0069391D5213BD5C
Date: Thu, 21 Mar 2019 09:02:50 GMT
Last-Modified: Wed, 20 Mar 2019 05:58:56 GMT
ETag: "d98f298bce5a81e41ca8f278324c5056"
Accept-Ranges: bytes
Content-Type: image/jpeg
Content-Length: 10857
Server: AmazonS3
$
|
几个注意点:
- return 301,302甚至是307需要按照实际需要进行配置
使用Nginx作为反向代理获取S3内容
不使用Nginx Cache时
如下是一个简单的Nginx反向代理获取S3文件再返回给客户端的例子。基于以下几个前提
- 测试域名为test.jibing57.com
- 所有放在S3上的静态文件,在网站上都以
/s3_proxy路径打头
- S3 Region为us-west-2, Bucket 为
s3-for-blog
- Nginx从后端S3中获取文件,再返回给客户端
nginx配置:
1
2
3
4
5
6
7
8
9
10
11
12
13
14
15
| location /s3_proxy/ {
proxy_http_version 1.1;
proxy_set_header Connection "";
proxy_set_header Authorization '';
proxy_set_header Host s3-for-blog.s3-us-west-2.amazonaws.com;
proxy_hide_header x-amz-id-2;
proxy_hide_header x-amz-request-id;
proxy_hide_header x-amz-meta-server-side-encryption;
proxy_hide_header x-amz-server-side-encryption;
proxy_hide_header Set-Cookie;
proxy_ignore_headers Set-Cookie;
proxy_intercept_errors on;
add_header Cache-Control max-age=31536000;
proxy_pass https://s3-for-blog.s3-us-west-2.amazonaws.com/;
}
|
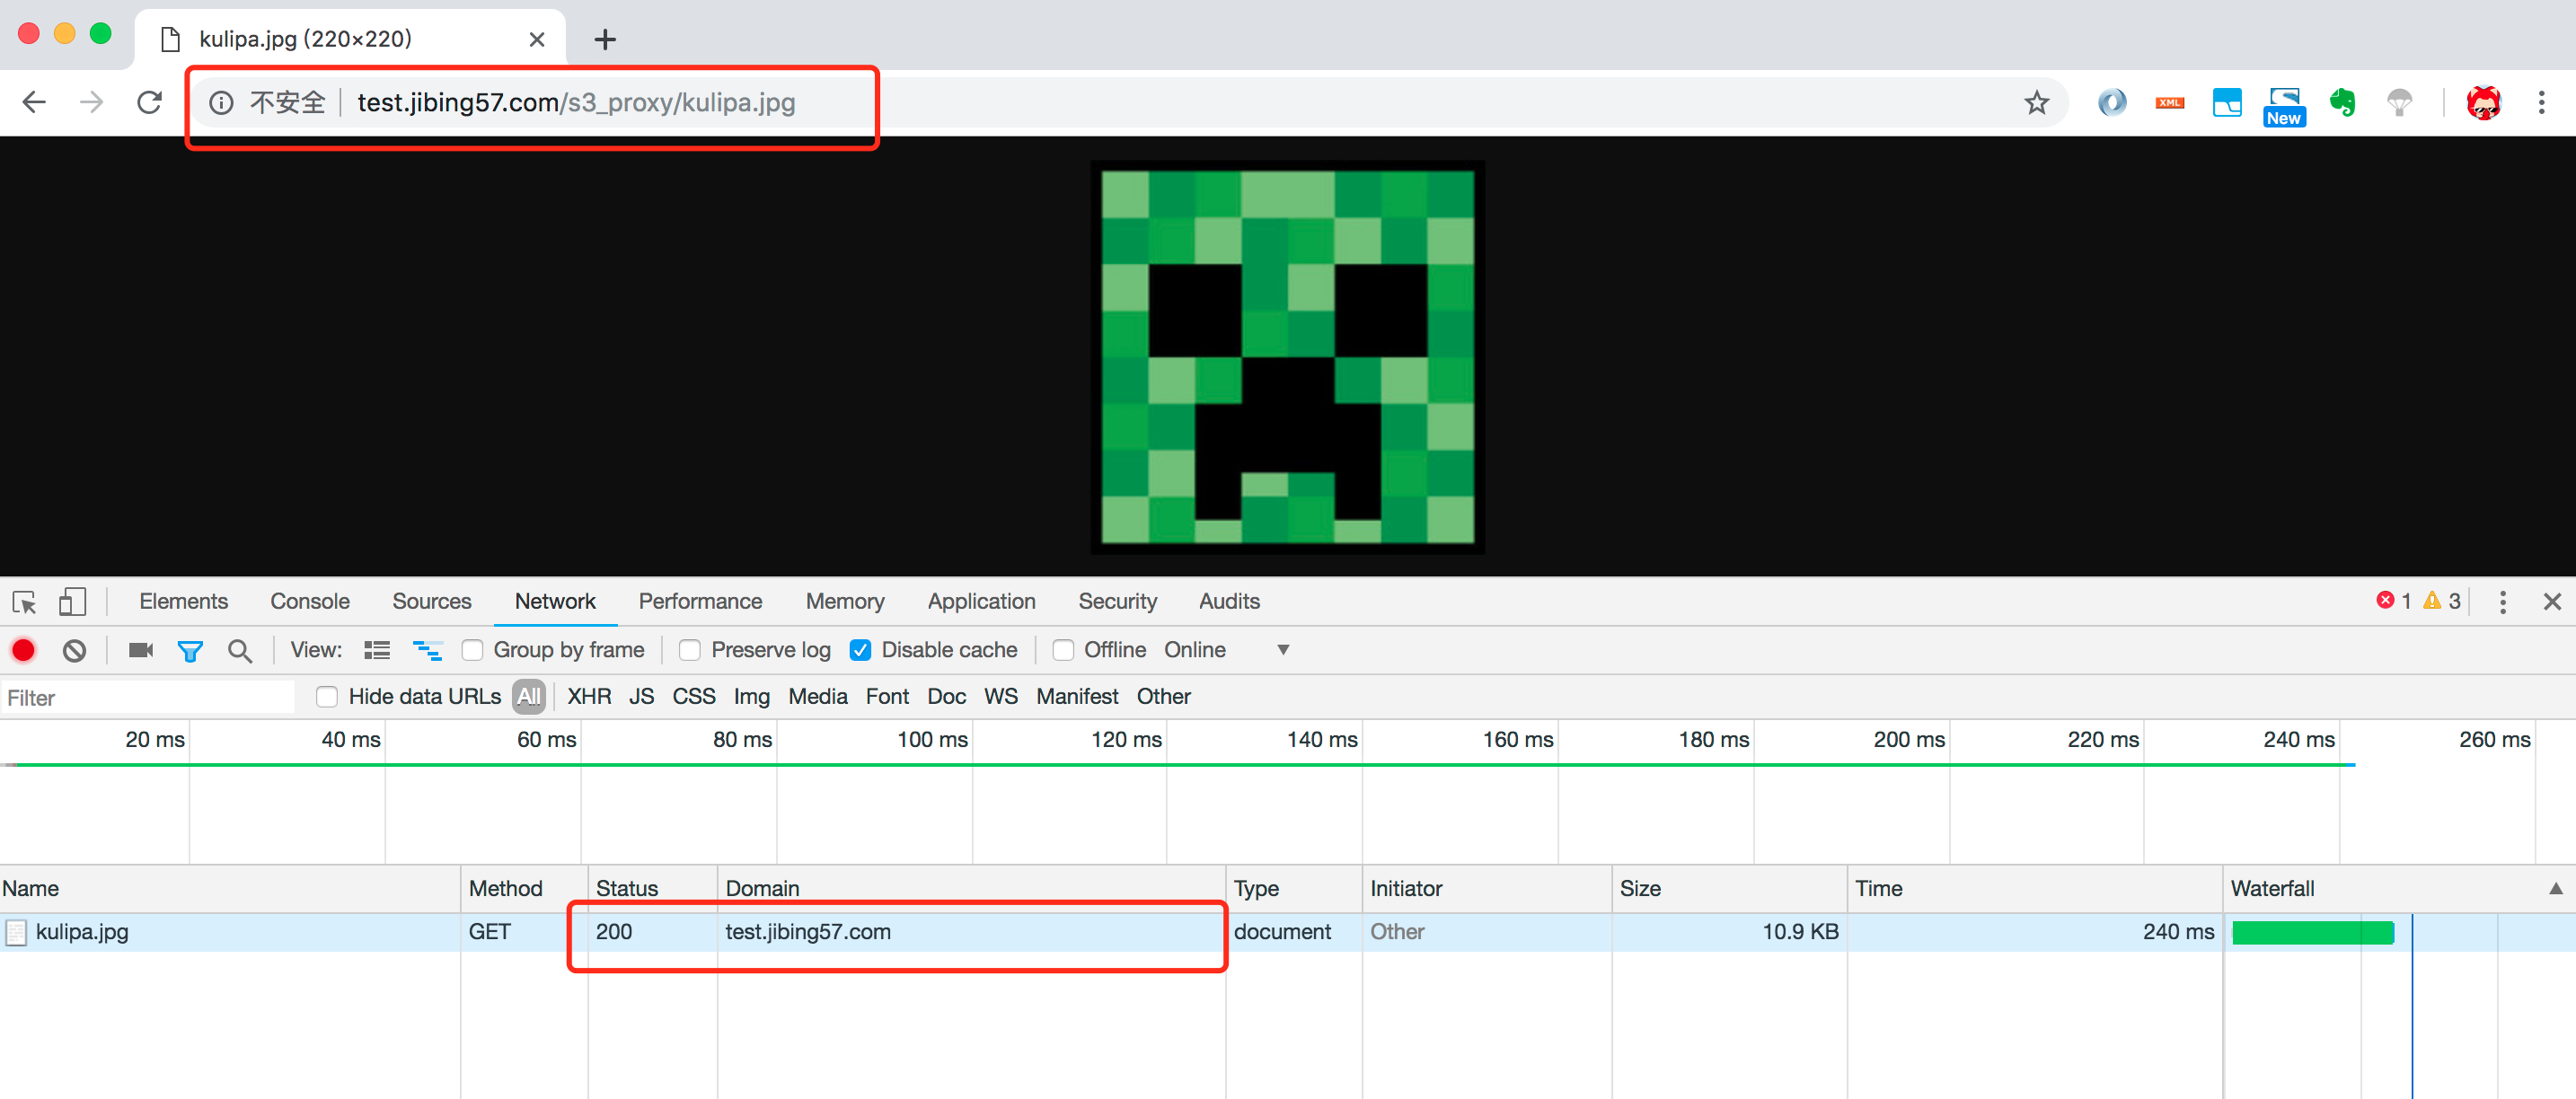
测试连接http://test.jibing57.com/s3_proxy/kulipa.jpg
Chrome侧访问测试链接的截图如下,整个过程对于客户端来说,只有200的response。
curl 命令输出:
1
2
3
4
5
6
7
8
9
10
11
12
13
| $ curl -L -I http://test.jibing57.com/s3_proxy/kulipa.jpg
HTTP/1.1 200 OK
Server: nginx/1.14.0
Date: Thu, 21 Mar 2019 09:18:58 GMT
Content-Type: image/jpeg
Content-Length: 10857
Connection: keep-alive
Last-Modified: Wed, 20 Mar 2019 05:58:56 GMT
ETag: "d98f298bce5a81e41ca8f278324c5056"
Accept-Ranges: bytes
Cache-Control: max-age=31536000
$
|
和上面direct方式相比,由于nginx的配置,少了amazon自定义的以x-amz打头的一些header, 并且header Server变为了nginx/xxxx,而不是AmazonS3
使用nginx cache缓存文件
如下是一个简单的Nginx反向代理获取S3文件,缓存后再返回给客户端的例子。基于以下几个前提
- 测试域名为test.jibing57.com
- 所有放在S3上的静态文件,在网站上都以
/s3_proxy_cache路径打头
- S3 Region为us-west-2, Bucket 为
s3-for-blog
- Nginx从后端S3中获取文件,返回给客户端,并缓存在本地
nginx配置:
1
2
3
4
5
6
7
8
9
10
11
12
13
14
15
16
17
18
19
20
21
22
23
24
25
26
27
28
29
30
31
32
|
http {
    ....
    proxy_cache_path   /tmp/ levels=1:2 keys_zone=s3_proxy_cache:10m max_size=500m
                     inactive=60m use_temp_path=off;
    ....
    server {
      ......
      location /s3_proxy_cache/ {
        proxy_cache            s3_proxy_cache;
        proxy_http_version     1.1;
        proxy_set_header       Connection "";
        proxy_set_header       Authorization '';
        proxy_set_header       Host s3-for-blog.s3-us-west-2.amazonaws.com;
        proxy_hide_header      x-amz-id-2;
        proxy_hide_header      x-amz-request-id;
        proxy_hide_header      x-amz-meta-server-side-encryption;
        proxy_hide_header      x-amz-server-side-encryption;
        proxy_hide_header      Set-Cookie;
        proxy_ignore_headers   Set-Cookie;
        proxy_cache_revalidate on;
        proxy_intercept_errors on;
        proxy_cache_use_stale  error timeout updating http_500 http_502 http_503 http_504;
        proxy_cache_lock       on;
        proxy_cache_valid      200 304 60m;
        add_header             Cache-Control max-age=31536000;
        add_header             X-Cache-Status $upstream_cache_status;
        proxy_pass             https://s3-for-blog.s3-us-west-2.amazonaws.com/;
      }
      ......
    }
}
|
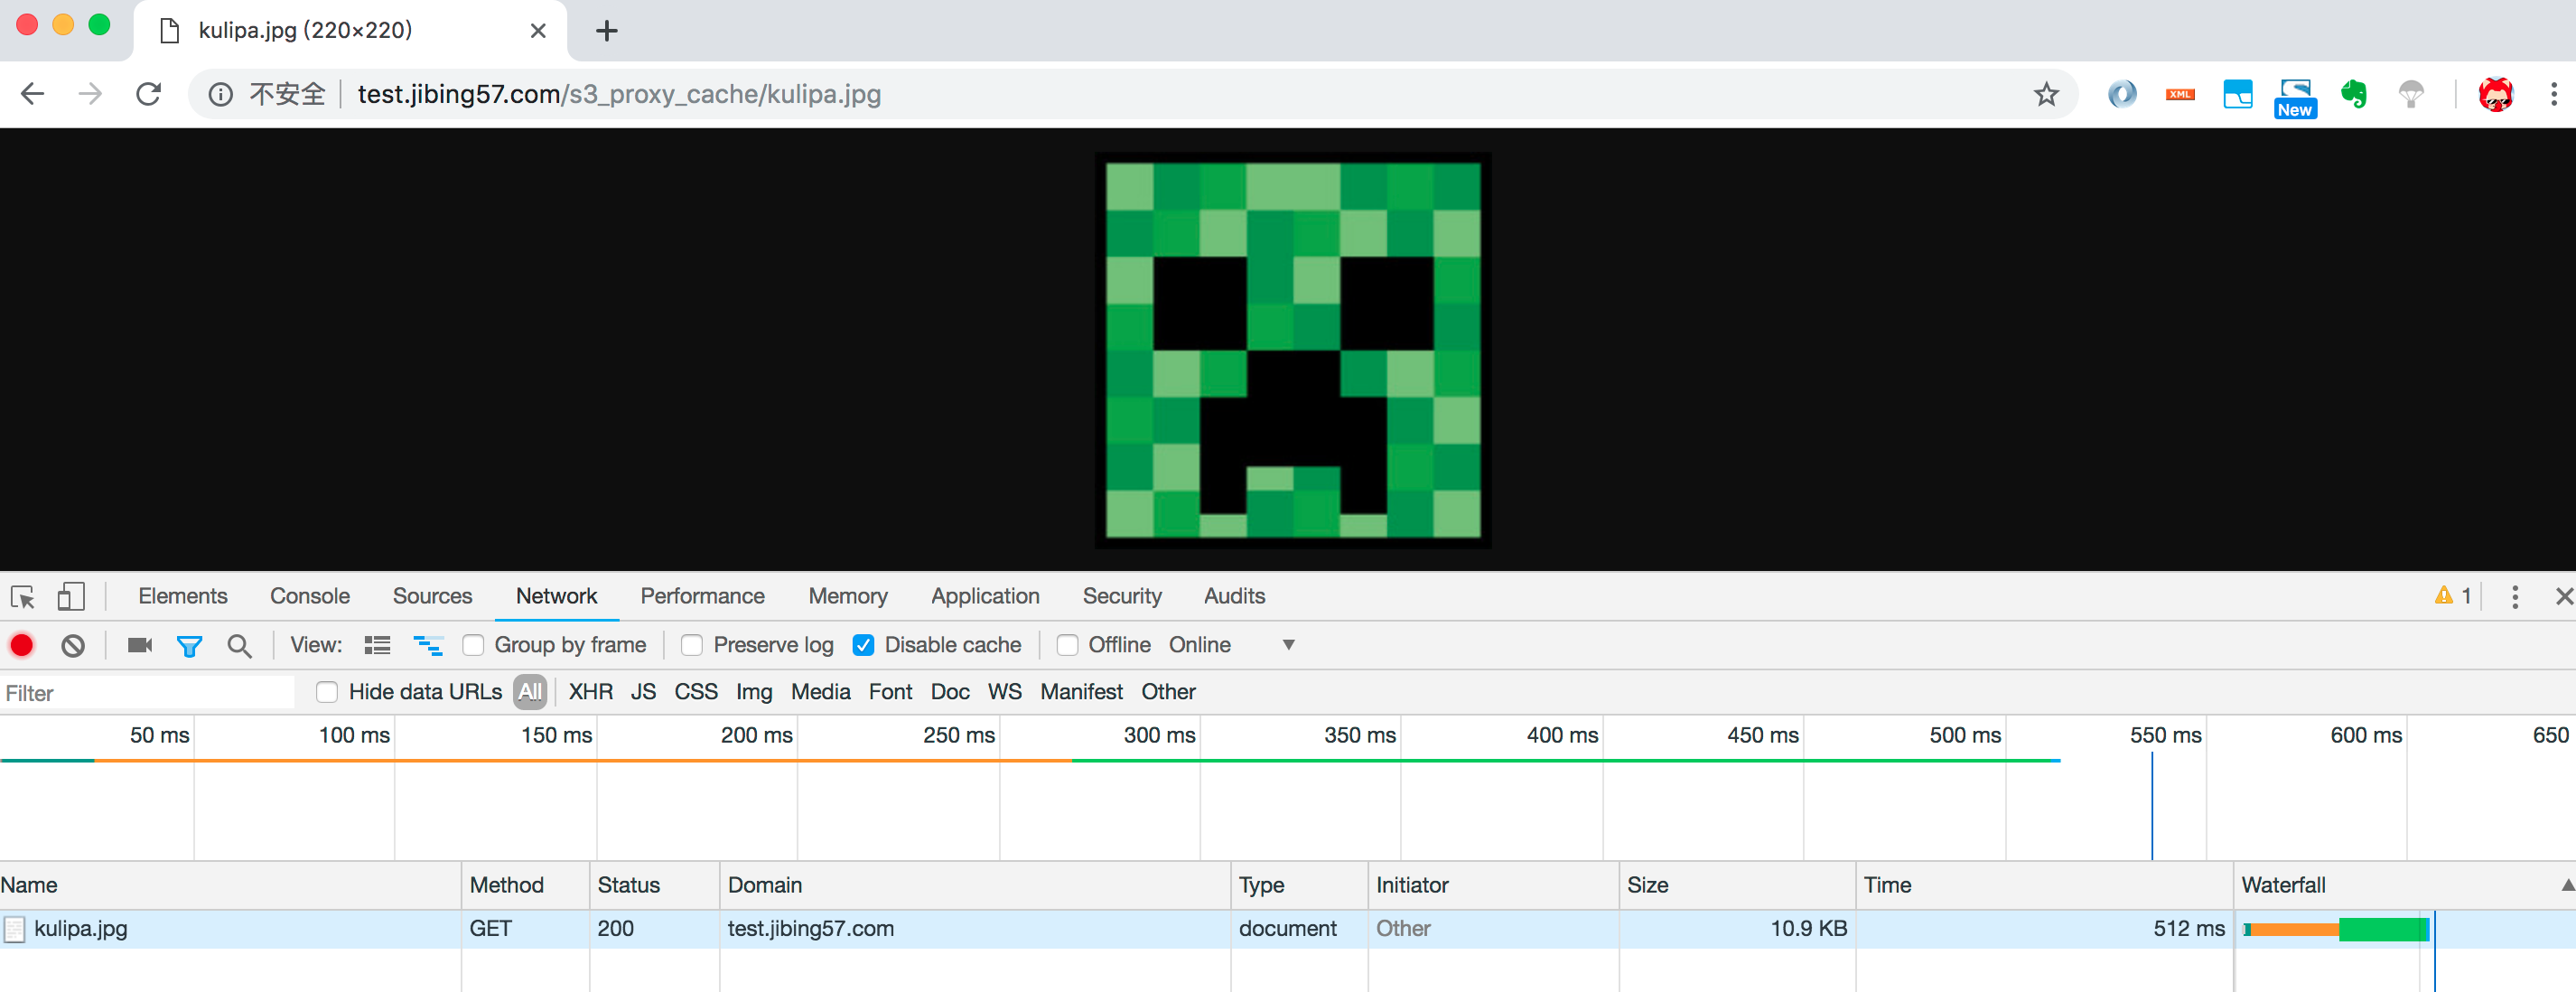
测试链接http://test.jibing57.com/s3_proxy_cache/kulipa.jpg
Chrom访问测试链接的截图如下,对客户端来说,只有200的response。
curl 命令输出:
1
2
3
4
5
6
7
8
9
10
11
12
13
14
15
16
17
18
19
20
21
22
23
24
25
26
27
28
| $ curl -L -I http://test.jibing57.com/s3_proxy_cache/kulipa.jpg
HTTP/1.1 200 OK
Server: nginx/1.14.0
Date: Fri, 22 Mar 2019 05:34:25 GMT
Content-Type: image/jpeg
Content-Length: 10857
Connection: keep-alive
Last-Modified: Wed, 20 Mar 2019 05:58:56 GMT
ETag: "d98f298bce5a81e41ca8f278324c5056"
Cache-Control: max-age=31536000
X-Cache-Status: MISS
Accept-Ranges: bytes
$
$ curl -L -I http://test.jibing57.com/s3_proxy_cache/kulipa.jpg
HTTP/1.1 200 OK
Server: nginx/1.14.0
Date: Fri, 22 Mar 2019 05:34:27 GMT
Content-Type: image/jpeg
Content-Length: 10857
Connection: keep-alive
Last-Modified: Wed, 20 Mar 2019 05:58:56 GMT
ETag: "d98f298bce5a81e41ca8f278324c5056"
Cache-Control: max-age=31536000
X-Cache-Status: HIT
Accept-Ranges: bytes
$
|
可以看到第一次X-Cache-Status状态是MISS,第二次请求就是HIT了。
注意点:
- 如果重启nginx时,有
"proxy_cache_path" directive is not allowed here in的错误提示时,则需要检查一下proxy_cache_path是不是没有放在配置文件的http下。
- 当proxy_cache_path中设置了缓存目录为
/tmp,但在/tmp/目录下,却没有找到缓存的文件时。别慌,记得查看下/lib/systemd/system/nginx.service中的PrivateTmp值有没有设为true,如果是true的话,在类似/tmp/systemd-private-1adb681dede84276b650ea38bfa4dc1d-nginx.service-z9XRZN/tmp这样的目录下找一下。具体原因参考CentOS 7下passenger-status报错中systemd PrivateTmp一章的说明
Reference