使用Hexo搭建Blog
Hexo 安装
安装前提
安装Hexo需要依赖如下两个程序, 需要提前安装
- Node.js
- git
安装Hexo
Node.js和git都安装完毕后,执行如下命令安装Hexo
1 | $ npm install -g hexo-cli |
初始化Blog
cd到存放博客的目标目录,执行hexo init命令
1 | $ hexo init my_blog |
其中my_blog就是博客所在的文件夹名字。
注意: 最新版的hexo不需要切换到文件夹下敲击npm install了,init的时候会一并安装所需的npm packet。
进入目录,目录结构类似如下.
1 | $ cd my_blog/ |
执行下面的命令开启hexo服务
1 | $ hexo -s --debug |
访问 http://0.0.0.0:4000应该就能看到默认的页面了。
配置
基本信息配置
打开博客根目录下的_config.yml文件,修改title, subtitle, description, author, url等个人信息
将language设置为default.
配置文件中默认参数的描述可以参见官网说明 https://hexo.io/zh-cn/docs/configuration.html
更换Theme
以下以更换hexo-theme-freemind主题为例:
安装
使用如下命令安装hexo-theme-freemind主题
1 | $ git clone https://github.com/wzpan/hexo-theme-freemind.git themes/freemind |
安装可选插件
1 | $ npm install hexo-tag-bootstrap --save |
启用freemind预定义的几个pages
Freemind 预先定义了 Categories(分类)、Tags(标签) 和 About(关于)页面,要使用它们,你需要先在博客的source目录中添加相应页面。
使用如下命令来生成几个Pages页面
1 | $ hexo new page "tags" |
修改生成的目录下的index.md文件为如下内容:
1 | $ cat about/index.md |
启用 freemind
在根目录_config.yml中,替换theme选项为freemind。
1 | # Extensions |
修改freemind的配置文件
- 修改
slogan - 修改
links为自己想要链接的网址 - 暂时不想开启评论,因此注释掉了
comment_js - 修改
theme来调整color theme,freemind所支持的color theme
freemind配置文件的详细解释参见freemind github中的Configuration章节。
freemind front-matter 选项
根据Github中的描述,freemind共提供了如下5个设置:
- description - a short description about the articles that will be display at the top of the post
- feature - sets a feature image that will be show at the index page
- toc - renders a table of contents
- top - pin the article to top if it is set to true
- issue_id - comment.js issue_id for explicitly point out which Github issue should be connect to your post. For most situations you don’t need it unless the post doesn’t link to the issue you want.
以Hexo默认生成的_posts/hello-world.md的为例来展示description,feature,toc,top四个设置的显示效果。
首先修改后的hello-world.md文件头部如下:
1 | title: Hello World |
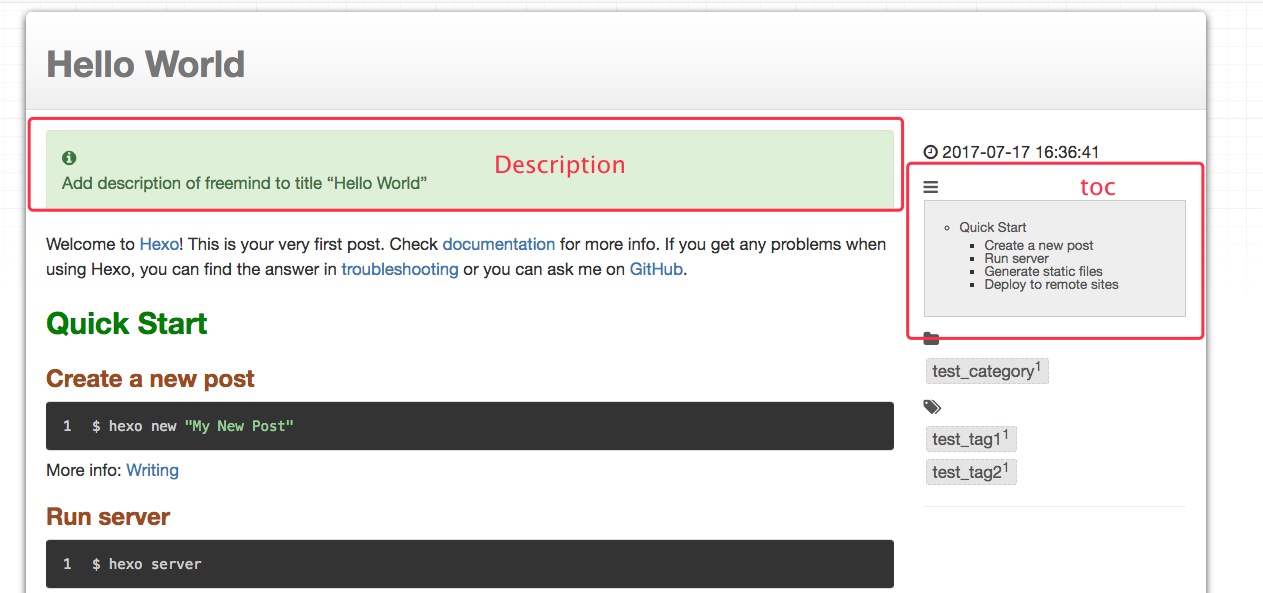
设置description和toc后的效果如下:
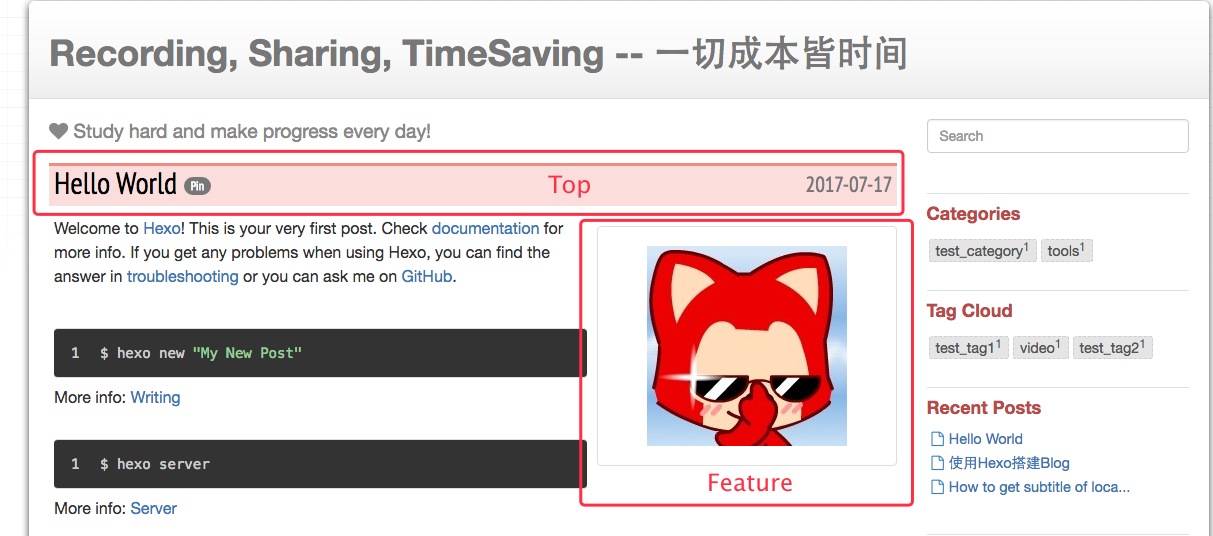
设置feature和top后的显示效果如下:
添加统计
开启百度统计
freemind自带百度统计功能,在主题的_config.yml中找到Analytics, 设置baidu_tongji一栏下面的enable为true,再添加上siteid即可
1 | # Analytics |
安装插件
安装豆瓣插件
安装豆瓣插件
1 | npm install hexo-generator-douban --save |
在hexo的_config.yml的Extensions设置下添加如下配置:
1 | douban: |
在freemind的_config.yml的menu项下添加豆瓣的page页面
1 | - title: Douban |
重启一下就能看到主页中Douban的page了。
安装rss插件
添加hexo-generator-feed插件
1 | $ npm install hexo-generator-feed |
修改_config.yml,添加Extensions
1 | # Feed Atom |
设置完成后,可以访问http://jibing57.github.io/atom.xml来检验是否成功生成。
安装sitemap
添加hexo-generator-sitemap插件
1 | $ npm install hexo-generator-sitemap --save |
修改_config.yml, 添加Extensions
1 | sitemap: |
设置完成后,访问http://jibing57.github.io/sitemap.xml来检验是否成功生成了sitemap
安装搜索插件
添加hexo-generator-search插件
1 | $ npm install hexo-generator-search --save |
post相关
修改默认的post脚手架
修改scaffolds/post.md,添加如下freemind支持的Front-matter, 每次hexo new post xx的时候,就自动会生成到新的post文件中,不用每次手动生成了。
1 | --- |
调整post的侧边栏
将Toc调整为显示时间之下,categories和tags之上,并且调整显示时间为精确到秒
修改调整 themes/freemind/layout/_partial/post/meta.ejs的内容如下:
1 | <!-- date --> |
Post文章在列表中的预览
默认情况下,在列表预览中会将所有的文章内容都显示出来,会显得比较冗余,可以在Post文章中,添加<!-- more -->预览标签,这样列表预览中只会显示文章开头到<!-- more -->预览标签之间的文字。
多tag
给文章设置多个tags的方法:
1 | # 方法1 |
deploy部署至Github Pages
deploy至Github Pages
首先需要在github上创建jibing57.github.io的repository, 其中jibing57需要替换为自己的github的用户名, 还需要在~/.ssh/config中设置好访问github的私钥。
安装Hexo的扩展
1 | $ npm install hexo-deployer-git --save |
修改_config.yml中deploy一栏的设置:
1 | deploy: |
使用以下命令发布到Github Pages
1 | $ hexo d |